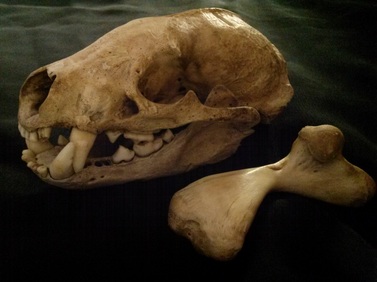
 raccoon skull, never whitened & naturally colored; turtle bone, whitened but aged raccoon skull, never whitened & naturally colored; turtle bone, whitened but aged This post is part of a series on the use of zoological remains in witchcraft. The term “zoological remains” refers to the physical remains of an animal after it has died. Within witchcraft, commonly used zoological remains include bones, shed skin, antlers, wings, claws, paws, pelts, organs, and even blood. Most of these items require some sort of preservation in order for them to be effectively put to use for any duration of time. This series of posts will explore the ideology behind the use of zoological remains in witchcraft, as well as more practical matters, such as acquiring and preserving material. Previous posts include An Introduction to Working with Zoological Remains and Bone Collecting: How-to Acquire Bones and Other Zoological Remains Regardless of Where you Live. Future posts will focus upon preserving wings and claws, tanning hides, and how to use zoological remains within your own practice. Once you’ve acquired animal remains that you would like to use in your witchcraft practice, the next step is to prepare them for use. Preparation will vary depending on what you have, as a found skull and fresh wing require very different methods to clean and preserve them, but will ultimately culminate with consecration. The general process (i.e. preparation, consecration, use) is the same regardless of whether the spirit of that animal is still attached to the remains or not. In this post, we’ll take a look at the various methods available for cleaning bones, with the next post in this series discussing how to clean and prepare items such as wings, paws, and claws for use. These methods are simple, require nothing more than materials you very likely already have in your home, but do differ in the amount of effort or time that is required. All will produce clean bones that you can then consecrate and begin using. Advance warning that this will be a rather technical post and may contain pictures that some find... gross. But, honestly, they hardly compare to some of the descriptions you'll find below. And in a post on cleaning bones, what else would you expect? BoilingThis method is best suited for fresh material as you will be, essentially, cooking excess tissues off of the bones –which results in a lot of smells. Better the meaty stew smells of a freshly skinned stag skull than the pungent aroma of a half rotted skunk carcass. You’ll need a pot at least twice as big as that which you’ll be cleaning. Stainless steel stock pots work great as they’re easy to clean and you don’t have to worry about transference* as you would with cast iron. A flat roasting pan will also work well for longer items or a collection of a bones to be cleaned at once. 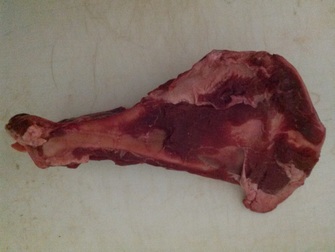 deer shoulder blade that needs more tissue removed before boiling deer shoulder blade that needs more tissue removed before boiling To start, you’ll want to clean the bones as much as possible. The less remaining tissue there is, the faster the bones will clean and the less touchup cleaning you’ll need to do afterward. That means skinning skulls and removing eyes, cheek meat, and as many other bits of tissue as you can. Rib cages should be stripped of as much flank meat as possible; removing tissue between ribs is only necessary for larger mammals and trying to boil clean deer or horse ribs is not the best method (consider burying, see below.) Fill the pot with enough water to thoroughly cover the bone(s); a good inch or two more of water covering the bone(s) is minimum. Just like making soup stock, you’ll be boiling the bone(s) to soften the tissue and cause it to drop off the bones. How long this takes will depend on what you’re trying to clean and how much tissue remains; expect it to take at least an hour. Covering the pot while it boils will keep the temperature higher in the pot and reduce the amount of moisture loss. However, you will still need to check the water level to ensure that the bones remain covered. A roiling boil isn’t necessary, but you should have a good amount of bubbles churning the water and encouraging the removal of tissue. NOTE: If using this method to clean a skull with antlers, try to keep the antlers out of the water to prevent discoloration**. Wire can be used to suspend the skull in the water, keeping the antlers out of the water as much as possible. Once finished, bones should be removed from the water and allowed to cool before rinsing. For particular stubborn tissue and bits of cartilage, you may have to try removing the tissue by hand. Following with the maceration method (adding a tiny amount of dish soap, if desired) will remove the last bits of remaining tissue. *Transference of what, you say? Depends on the pot. Cast iron is great at holding onto things, flavor of past meals, residual energy of past spells, etc. **Antlers will turn white. This discoloration can be brought on through boiling, through whitening, through exposure to the sun, and even through handling. Burying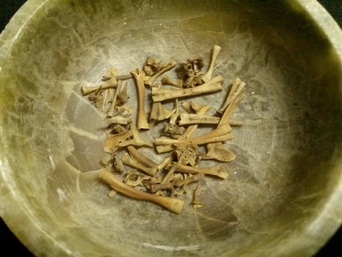 bones of a wood toad bones of a wood toad This method is ideal when decomposition has already set in. There are no nasty smells nor gooey parts to deal with. Down side is, it takes a minimum of 3 months to have clean bones. Larger carcasses can take as much as a year to be clean. But, aside from the inconvenience of having to wait you literally have nothing to do but dig a hole. For smaller animals like birds, toads, snakes, and smallish sections of larger animals, burying in a flower pot is recommended. This lowers the chances of losing smaller bones as can happen if you bury in your yard or garden. Plus, you don’t have to mark where you’ve buried it or worry about your markers being moved by “helpful” family members. You’ll want to place the remains so that there is a good layer of dirt above and below; aiming for placement about 2/3 of the way down is ideal. Potting soil or dirt from your yard will both suffice, though you want to ensure that the soil is kept damp. This helps to encourage decomposition and keeps the microorganisms within the soil happy (and those microorganisms are your bone cleaning cohorts.) 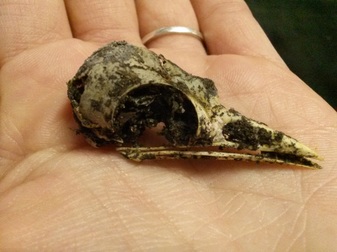 robin skull damaged by beetles while buried robin skull damaged by beetles while buried As mentioned earlier, smaller animals like small birds, toads, medium size snakes, and chipmunks will take about 3 months to be clean. When that time has passed, carefully remove layers of soil (setting that dirt to the side so you can check it for random bones) until you reach a bone. Check to make sure that decomposition is finished. If there is anything gooey, cover with dirt and let it sit another month, watering often. If you have clean bones, pick them out and set them to the side. Continue removing shallow layers of dirt until you believe you have all of the bones. Then sift through the remaining soil to be sure that beetles haven’t moved bones about, as beetles are wont to do. Give them a good rinse to removing dirt before whitening. Placing them in a bowl of water and swirling is usually enough, though you may need to scrub some dirt off. An old toothbrush works great for larger bones with stubborn dirt, though wiping with a cloth is usually enough. Soaking for a day or two in vinegar (swirling or mixing often) can also be used to remove dirt, crunchy bits of tissue, and yucky smells. If using vinegar, I like to follow with a soak in water with a tiny bit of dish soap to remove the vinegar smell and provide extra cleaning. Either way, a clean water rinse and wipe down should follow. MacerationThis method works well regardless of the state of the remains and also works as a good follow up to the above cleaning methods (as mentioned in each.) Maceration works by softening any remaining tissue and loosening its hold onto the bones. But it does result in some pretty potent smells regardless of whether you have freshly boiled bones or a slightly decomposed crow carcass. Depending on the size of the animal, you may be able to use a jar with a tight fit lidding (totally recommended!) or a five-gallon pail. Regardless of what you use to hold the remains, you will want to be able to cover it in some way to reduce smells. Place the remains into your container and fill with water until thoroughly covered. You’ll want to swirl or stir the contents once a day to help all remaining tissue to fall off. How long this method takes depends on a few factors: the size of the animal, how much tissue remains, and whether or not it’s a bird (feather just seem to complicate things which is why I prefer to bury birds.)  rabbit bones cleaned with maceration after boiling rabbit bones cleaned with maceration after boiling I’ve only ever used this method as a follow up for boiled bones, which took about a week to remove the last bits of tissue. For something larger than the size of a rabbit, I would expect this method to take a few months. Keep in mind, the water is going to get really funky. If you think the smell is bad, just wait until you have to dump your bucket out and sort through the resulting goo to pick out your bones. If you’re brave, however, and choose this method. I recommend a follow up soaking in clean water with a small amount of dish soap to knock out smells and eat any nasty things that may remain. Whitening the BonesNow that you have your bones free of any remaining tissue and cleaned, the next step would be to whiten them. This is, of course, a completely optional step as the rugged coloring of found bones and the natural discoloration that comes with aging gives them a lot of character. Personally, I prefer this more natural look to sparkly white bones both for its aesthetic and because it requires less invasive cleaning and no harsh chemicals. From a practical standpoint, I’ve been led to believe that this extreme whitening does not diminish a bone’s ability to be a spirit house, but I’ve no knowledge of whether a spirit already attached to the bones will stick around through the process. Never use the sun to whiten bones. Yes, it will whiten them but it also makes them brittle, leaving you with bones that are better suited to be ground and used in your herbcraft than to be used as any sort of spirit house. Commercial methods for whitening bones involves using a stronger concentration of hydrogen peroxide. This is available from taxidermists and some hunting supply shops, however, you’ll then be dealing with stronger chemicals. And, like I said, no idea if a spirit still attached to the bones will stick around through the process. Good results can still be gotten with the household variety of hydrogen peroxide. Often, you can get large bottles for just $1 which makes it a more economical choice, too. Once your bones are thoroughly clean and dry, you can either soak them in hydrogen peroxide or carefully wrap the bone(s) in cotton pads or absorbent cloths and pour the hydrogen peroxide onto the bone(s), thoroughly wetting the cloth. Keep the bones in contact with the peroxide at least overnight. NOTE: Keep the hydrogen peroxide off of antlers and horns. It will discolor them. If you use the cloth method, use the clothes to wipe down the bone(s). This works to remove any last traces of dirt, as well as helping to remove the red and green mold patterns that can be present on bones found in marshy areas. If you soaked your bone(s), you should still thoroughly wipe down the bones with a clean cloth. Once dry, your bones are ready to be consecrated, reddened, and put to use.  found turtle bones yet to be cleaned; the spirit that was attached to them agreed to reside in one bone alone, these are bare If you suspect that a spirit is still attached to the bones in any way and have no intentions of helping the spirit to cross over, preferring to keep it as an ally, then extra steps should be taken throughout the entire process of cleaning the bones. Speak with the spirit throughout the process, letting them know what you are doing and why you are doing it. I like to sing to the spirit while cleaning its bones. This is especially helpful when the spirit is upset, hostile, or confused. A lot of spirits can be angry at first, especially depending upon the way they died and what happened to their body afterward. Singing helps to soothe the spirit, to ease its pain, and to convey your empathy for it. One of the best places to incorporate singing is when whitening the bones. Sing soft, soothing songs as you gently wrap the bones in cloth. Sing songs of purity and peace as you wet the cloth with the hydrogen peroxide. Sing songs of healing and compassion as you wipe the bones clean. The words aren’t so important as the notes and the energy you put into them. Let the song come from within you, flowing as it will. Ready to Take it Further?
Comments are closed.
|
Throwing the Bones
Stay Connected

Archives
January 2023
|

