|
Kids and crafts naturally go hand-in-hand, and magickal crafts are no exception! Making charms, such as amulets, talismans, and wards, are a great way to not only teach your children magick but to recognize that magick is a part of every day life. Children are naturally tactile: they like to feel things, be it touching objects with their hands, or feeling the movements of their bodies as they dance and run about. Keeping their hands active is a great way to keep them interested and focused, focused enough to notice the slight energy changes that occur when they really concentrate. I am a big fan of salt-dough. It's easy to make and lends itself well to a wide variety of projects. But, best of all, making it can easily be rendered a magickal process and it can be used to make magickal objects. Scrying bowls, candle holders, offering bowls, and Sabbat decorations are all possibilities. This is is an example of using salt-dough to make magickal charms. For my family, this was a combination of art class and magickal lesson (oh, the joys of Pagan homeschooling!) As part of a salamander unit, we decided to make salamander figures. Magickally, salamanders correspond to the Element of Fire, making them perfectly suited for protection. To increase the magickal oomph of the standard salt-dough recipe, we added some herbs that correspond to the Fire Element, too. 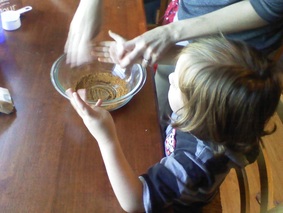 Brushing empowered herbs from Titus' hands. Brushing empowered herbs from Titus' hands. Salt Dough Recipe 2 cups Flour 1 cup Salt 1 TBS dried powdered Herbs (e.g. Cinnamon, Ginger, Turmeric) 1/2 cup Water In a medium sized bowl, mix together your herbs. This is the first stage of empowering, so be sure to mix with your hands. If you've more than one child, it's easier to pass the bowl around and let them each blend the herbs alone. This makes it easier for them to concentrate on sending "fiery" protective energy from their tummies, down their arms, and out their hands. To keep everyone focused and quell any bickering,if you've more than one child and you're using more than one herb, each child could add an herb to the bowl, then they can take turns blending and empowering. 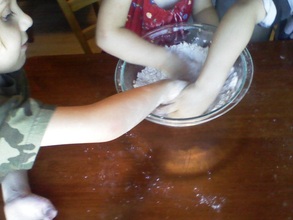 Everyone works together to mix and empower. Everyone works together to mix and empower. Once thoroughly blended, empowered, and little fingers have been brushed off (more or less,) add in the flour and salt. Magickally, salt is cleansing and protective, which further makes salt-dough perfect for magickal crafts. At this stage for the mixing and empowering, we mix and empower together. The symbolism here is on the many as one: the members of our family, the ingredients of the recipe, all are joined now as one greater unit to one common goal. Don't forget to remind your little ones to send that hot, Fire energy from their tummies, down their arms, and out their hands; their focus must be strong for the magick to be strong. When it looks as if everything is blended thoroughly (salt and herbs evenly distributed,) it's time to mix in the water. This part is messy, you can use a wooden spoon (after all, a wooden spoon is nothing more than the magick wand of the kitchen...) which may help with preventing messy bits from flying through the air, though it's more than likely going to happen regardless, especially if you have really young kids. Resist the urge to add more water, just keep mixing. The finished dough should be like biscuit dough: moist but holds together, no little crumbs left in the bowl. Roll the dough into a ball then roll out into a log: cut into even sections to distribute to your kids. Don't forget to cut one off some of the dough for you, too! 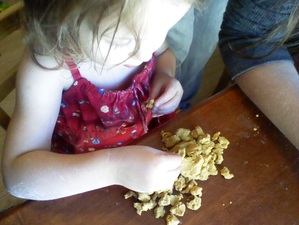 Making charms is a complicated process. Making charms is a complicated process. Salt-dough works similar to clay: you can easily mold it with your fingers and when attaching pieces to each other you will have to score both parts at the point where they will connect, wet them, squish them together a bit, and blend them at the seam line. Otherwise, the pieces will probably break off while drying (don't panic if this happens anyway! You can easily glue any pieces that do fall off back on, super glue is your friend.) You'll want to keep some water on hand to smooth out any cracks that appear just from molding and shaping the dough. Also, depending upon how long it takes to complete your magickal masterpiece (that's right, I assume you will take longer than your kids, after all, I did... :D) you may need to wet your fingertips to keep the dough moist and pliable. Try to keep your charms thinner to avoid cracking from uneven drying. Also, salt-dough is not as firm as clay, so if making something like a goblet or chalice will not work, as the stem will not be able support the cup and the entire thing will smoosh down. Just warning you. Remember to focus on your intent while shaping your work of magickal art! This is the third and final empowerment, three is the number of creation (i.e Mommy, Daddy, baby) so make this final one a good one. Remind your little ones to focus on the Fire energy in their tummies, send it down their arms, and out their hands. Make fearsome little salamanders, fill 'em with Fire, and know that they will keep you and your home safe. 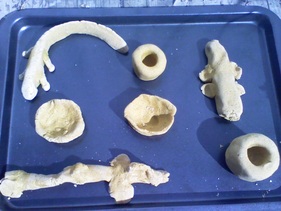 Finished amulets soaking up Solar energy. Finished amulets soaking up Solar energy. When finished you need to dry your amulets. They must dry slowly or they will crack. If you are choosing to make super snazzy protective charms like we did, you may want to place your charms outside to dry in the Sun, allowing them to soak up some protective Solar energy. Or, you can bake them in the oven (lowest temperature setting) or allow them to air dry. Be advised, regardless of which way you choose to dry them, it will take at least 1 day. Thinner objects will dry faster, and oven baking will speed up the time, too, but if you try to dry them too fast your charms will crack. Thicker objects may crack despite how slow and carefully you dry them, too.
When fully dry, you can paint your charms. Acrylic paints work very well, but a washable tempera paint (quite possibly, the best paint a parent can buy...) also works well. If you do choose to paint them, a heavy coat of varnish will help preserve your charms, sealing out any moisture. Without painting, the life of your salt-dough creation is limited, as salt-dough is very porous and readily absorbs moisture from the air. However, my mother does still have a salt-dough duckie I made in 2nd grade that was never painted and while it may be intact, it has turned a nasty color and I do expect it to begin to rot soon. Both of our boys ended up making salamanders (bottom left and top right;) Aurora decided to make a candle holder (bottom right; she had some help.) Out of the extra dough, we made another candle holder (top middle) and both boys made a small bowl to hold either offerings or a few of their crystals (middle.) Have fun, make a mess, live magickally! 10/4/2017 04:18:17 am
My girls and I do love the salt dough! Actually, it has been a while since we made anything like this. Perfect opportunity for some weekend crafts as we approach Samhain :)
Althaea
10/6/2017 11:13:13 pm
Absolutely! Salt dough is so wonderfully versatile -and environmentally friendly. So using it to make small offeratory gifts to leave outdoors for spirits passing by or leaving at the graves of family members/ancestors is an option, too, in addition to protection charms. And it's a great way to impart the importance of Samhain to your children in a hands on way. :) Comments are closed.
|
Throwing the Bones
Stay Connected

Archives
January 2023
|
